Machine Learning with Docker Containers from NGC
A Quick Guide for Machine Learning Development Environment Setup Using NGC
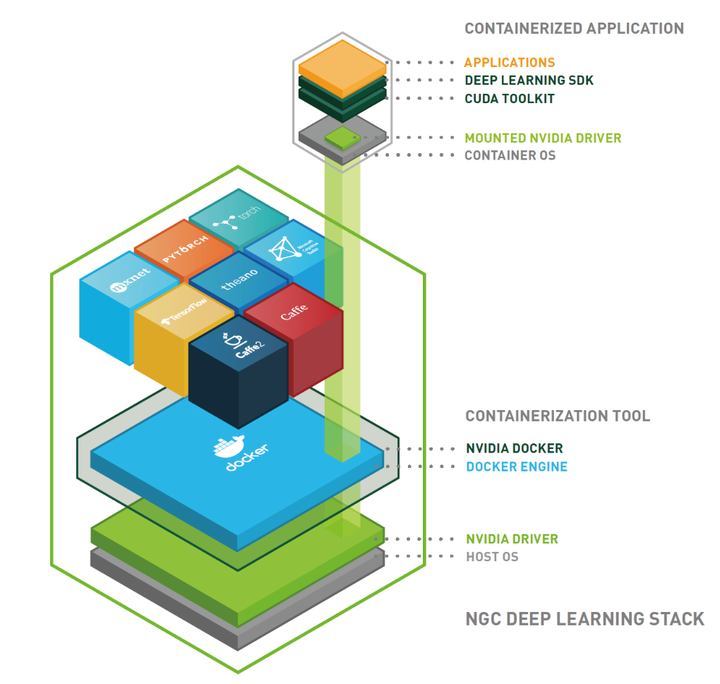 Image credit: NVIDIA
In the area of machine learning, especially deep learning, setting up the development environment used to be essential and trivial work. Moreover, the stand-alone environment usually was delicate and vulnerable. After struggling in manually installing software one by one, packages manager and virtual environments were popularized and saved people much trouble by installing packages or lists. But nowadays when it comes to maintaining quality, consistency, and reliability of the environment, for example, setting up one identical development environment in several different servers, or setting up several different development environments in one server, it can be challenging. Containers are isolated from one another and bundle their own software, libraries and configuration files, it could be a perfect solution to meet the challenges. To maximize the advantages of containers, NVIDIA developed a software eco-system for containers as shown in the above figure, and published a registry of NGC containers. This document will introduce the concepts of NGC, set up a machine learning development environment using NGC containers, and implement a typical application scenario.
1 What is NGC
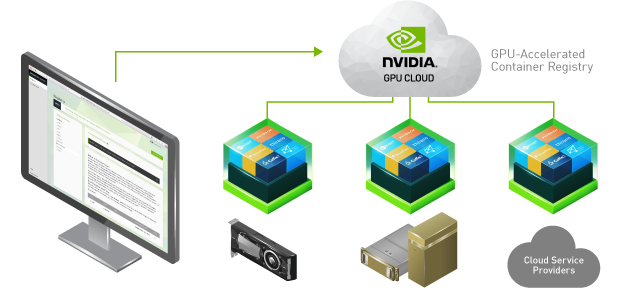
The NVIDIA GPU Cloud catalog is the hub for GPU-optimized software for deep learning (DL), machine learning (ML), and high-performance computing (HPC) that accelerates deployment to development workflows so data scientists, developers, and researchers can focus on building solutions, gathering insights, and delivering business value.
The content provided by NVIDIA and third party ISVs simplify building, customizing and the integration of GPU-optimized software into workflows, accelerating the time to solutions for users.
The NGC Catalog consists of containers, pre-trained models, Helm charts for Kubernetes deployments and industry specific AI toolkits with software development kits (SDKs).
“NGC Applications” Source: NVIDIA
2 Why NGC
NGC provides software to meet the needs of data scientists, developers, and researchers with various levels of AI expertise. Software hosted on NGC undergoes scans against an aggregated set of common vulnerabilities and exposures (CVEs), crypto and private keys.
In addition to security scanning, NGC software is tested against a broad range of GPU- enabled platforms including public cloud instances, workstations and OEM servers targeted for the datacenter or edge deployments. Supported GPUs include V100, A100, T4, Jetson and the RTX Quadro.
NGC software is tested and assured to scale to multiple GPUs and in some cases, to scale to multi-node ensuring users maximize the use of their gpu-powered servers out of the box.
For a select set of containers, NVIDIA offers NGC Support Services for running software on DGX platforms or certified OEM servers. The service gives enterprise IT direct access to NVIDIA subject matter experts to quickly address software issues and minimize system downtime.
- Multiple versions of the same application, which may have conflicting software dependencies, can run on the same server.
- Containerized applications can be deployed on premise, in the cloud, or at the edge.
- Specific GPU resources can be allocated to a container for isolation and better performance.
- Easily share, collaborate, and test applications across different environments.
- Resolve network-port conflicts between applications by mapping container-ports to specific externally-visible ports when launching the container.

“Why NGC Containers” Source: Simplifying AI, HPC, and Visualization Workflows with GPU-Optimized Containers from NGC by Chintan Patel
3 Presuppositions
NVIDIA drivers, NGC and Docker support many Linux distributions. This document is based on Ubuntu 18.04 LTS, therefor cannot ensure it is feasible on other Ubuntu versions or Linux distributions.
| OS | GPU | GCC | Shell |
|---|---|---|---|
| Ubuntu 18.04 | CUDA-Capable GPU | latest build-essential package | bash |
4 Install NVIDIA Driver
NVIDIA drivers are available in three formats for use with Linux distributions: Runfile installers, Package managers and Containerized drivers.
In this document, all installations will use package managers on specific repositories for version control and compatibility reasons.
Execute the following commands line by line to install NVIDIA drivers, including GPU drivers and CUDA drivers.
$ sudo apt-get install linux-headers-$(uname -r)
$ distribution=$(. /etc/os-release;echo $ID$VERSION_ID | sed -e 's/\.//g')
$ wget https://developer.download.nvidia.com/compute/cuda/repos/$distribution/x86_64/cuda-$distribution.pin
$ sudo mv cuda-$distribution.pin /etc/apt/preferences.d/cuda-repository-pin-600
$ sudo apt-key adv --fetch-keys https://developer.download.nvidia.com/compute/cuda/repos/$distribution/x86_64/7fa2af80.pub
$ echo "deb http://developer.download.nvidia.com/compute/cuda/repos/$distribution/x86_64 /" | sudo tee /etc/apt/sources.list.d/cuda.list
$ sudo apt-get update
$ sudo apt-get -y install cuda-drivers
Reboot the server before the next step.
To verify the NVIDIA GPU driver installation, use nvidia-smi command to check the GPU driver version and CUDA version, as shown below.
  $ nvidia-smi
  Mon Mar 15 04:31:30 2021
  +-----------------------------------------------------------------------------+
  | NVIDIA-SMI 460.32.03    Driver Version: 460.32.03    CUDA Version: 11.2     |
  |-------------------------------+----------------------+----------------------+
  | GPU  Name        Persistence-M| Bus-Id        Disp.A | Volatile Uncorr. ECC |
  | Fan  Temp  Perf  Pwr:Usage/Cap|         Memory-Usage | GPU-Util  Compute M. |
  |                               |                      |               MIG M. |
  |===============================+======================+======================|
  |   0  GeForce GTX 108...  On   | 00000000:01:00.0 Off |                  N/A |
  | 26%   47C    P8    19W / 250W |      1MiB / 11175MiB |      0%      Default |
  |                               |                      |                  N/A |
  +-------------------------------+----------------------+----------------------+
  |   1  GeForce GTX 108...  On   | 00000000:02:00.0 Off |                  N/A |
  | 23%   41C    P8    10W / 250W |      1MiB / 11178MiB |      0%      Default |
  |                               |                      |                  N/A |
  +-------------------------------+----------------------+----------------------+

  +-----------------------------------------------------------------------------+
  | Processes:                                                                  |
  |  GPU   GI   CI        PID   Type   Process name                  GPU Memory |
  |        ID   ID                                                   Usage      |
  |=============================================================================|
  |  No running processes found                                                 |
  +-----------------------------------------------------------------------------+
5 Install Docker Engine
Before installing Docker Engine, uninstall older versions of Docker if they are installed.
$ sudo apt-get remove docker docker-engine docker.io containerd runc
Execute the following commands line by line to install Docker Engine. Here we install Docker Engine with version 19.03 due to the recommendation of NVIDIA.
$ sudo apt-get update
$ sudo apt-get install apt-transport-https ca-certificates curl gnupg lsb-release -y
$ curl -fsSL https://download.docker.com/linux/ubuntu/gpg | sudo gpg --dearmor -o /usr/share/keyrings/docker-archive-keyring.gpg
$ echo "deb [arch=amd64 signed-by=/usr/share/keyrings/docker-archive-keyring.gpg] https://download.docker.com/linux/ubuntu $(lsb_release -cs) stable" | sudo tee /etc/apt/sources.list.d/docker.list > /dev/null
$ sudo apt-get update
$ sudo apt-get install docker-ce=5:19.03.15~3-0~ubuntu-bionic docker-ce-cli=5:19.03.15~3-0~ubuntu-bionic containerd.io -y
To verify the Docker Engine installation, run the hello-world image using the following command. The command downloads an image and runs the image in a container that prints a message then exits.
$ sudo docker run hello-world
To avoid sudo when use docker, add the user to the docker group.
$ sudo groupadd docker
$ sudo usermod -aG docker $USER
$ newgrp docker
6 Install NVIDIA Container Toolkit
To communicate GPU and containers, NVIDIA developed the Container Toolkit which includes a container runtime library and utilities to automatically configure containers to leverage NVIDIA GPUs.
Execute the following commands line by line to install NVIDIA Container Toolkit.
$ curl https://get.docker.com | sh && sudo systemctl --now enable docker
$ distribution=$(. /etc/os-release;echo $ID$VERSION_ID) && curl -s -L https://nvidia.github.io/nvidia-docker/gpgkey | sudo apt-key add - && curl -s -L https://nvidia.github.io/nvidia-docker/$distribution/nvidia-docker.list | sudo tee /etc/apt/sources.list.d/nvidia-docker.list
$ sudo apt-get update
$ sudo apt-get install -y nvidia-docker2
$ sudo systemctl restart docker
Run the below command to verify the NVIDIA Container Toolkit installation. The output should be the same with the command nvidia-smi.
$ docker run --rm --gpus all nvidia/cuda:11.0-base nvidia-smi
7 Set Up Environment with NGC
7.1 Accessing NGC Container
Before using the NGC container, users need to sign up an NGC Registered Account to receive an API Key, which will allow users to pull containers from NGC.
Sign in to NGC Catalog. From a web browser, go to https://ngc.nvidia.com/signin/email and then sign in or sign up.
In the top right corner, click your user account icon and select “Setup”.
Click “Get API key” to open the Setup > API Key page.
Click Generate API Key to generate your API key.
A warning message appears to let you know that your old API key will become invalid if you create a new key. Click Confirm to generate the key.
Note the “Username” and “Password” for later use.
7.2 Pulling NGC Container
7.2.1 Logging in to the NGC container registry
Before accessing NGC containers, users need to log in to the NGC registry from the command line as follows.
- Log in to the NGC container registry.
$ docker login nvcr.io
Enter the username
$oauthtoken.Enter the password.
Confirm “Login Success”.
7.2.2 Pulling a container from the NGC container registry
Browse the available containers in the NGC container registry by opening the NGC Catalog using a web browser, select the image to pull, then copy the pull command. The following screenshot shows the pull command on the PyTorch container page.

Then paste the command in the server terminal and execute it. For example, to pull the PyTorch container, execute the below command.
$ docker pull nvcr.io/nvidia/pytorch:21.02-py3
The meaning of above image string is as shown below:
| nvcr.io | /nvidia | /pytorch | :21.02-py3 |
|---|---|---|---|
| registry name | space name | image name | tag name |
If a tag is not specified, then the tag ‘latest’ will be used.
When the pull is done, list the Docker images to confirm that the container information.
$ docker images
7.3 Running NGC Container
There are two method to enable GPU support for NGC containers.
| GPU Support Method | Command | When Used |
|---|---|---|
| Native GPU Support | docker run --gpus ... | Included with Docker-ce 19.03 or later |
| NVIDIA Container Runtime for Docker | nvidia-docker run ... | If the nvidia-docker2 package is installed |
In this document, the native GPU support method was chosen to run containers.
A run command format is like:
$ docker run --gpus all -it --rm –v local_dir:container_dir nvcr.io/nvidia/image_name:tag_name
Explanation:
--gpus all: enable GPU support, for all the GPUs.
-it: run the container in interactive mode.
--rm: delete the container when finished.
-v local_dir:container_dir: mount a container directory to a local directory, e.g. /home/user/data:/workspace, which means the directory workspace in the container, is exactly the same as the directory /home/user/data in the server that is running the container.
More details about the docker run command can be found in Docker run reference.
If the previous pull image command was done, now we can run a container from the pulled image (assuming the first 3 letters of the image ID is “2e7”):
$ docker run --gpus all -it --rm –v /tmp:/tmp 2e7
8 A Typical Scenario
Combining the advantages of containers, package managers and virtual environment, there are many application scenarios for NGC. This section will implement a typical machine learning development scenario, as shown in the below figure: using a Jupyterlab terminal remotely training a model in an NGC container.

“Machine Learning Development Environment with Container” Source: Why use Docker containers for machine learning development? by Shashank Prasanna
There is a host machine in the above figure which undertakes all heavy computing work using CPU/GPU, the container isolated the development environment, data transfer between the container and host by mounted directory, the developer is using Jupyterlab/notebook to work remotely.
Jupyterlab and Jupyter notebook are installed by default in most NGC machine learning images. What has to do is setting up the container name, Jupiter port number, host port number and terminal port number. Here we set all ports are “9999”, the container name is “cont1”.
- Start a container with specific port number and container name.
# docker run --gpus all -it --rm -p local_port:container_port --name container_name -v local_dir:container_dir tag
user@host: $ docker run --gpus all -it --rm -p 9999:9999 --name cont1 -v /tmp:/tmp 21b
- Start Jupyterlab sever remotely from a remote terminal.
# ssh user_name@host_ip docker exec container_name 'jupyter lab --ip 0.0.0.0 --port container_port --allow-root'"
user@local: $ ssh $USER@x.x.x.x docker exec cont1 'jupyter lab --ip 0.0.0.0 --port 9999 --allow-root'
- Establish SSH channel from remote terminal to access Jupyter sever running in the host machine.
# ssh -Y -fN -L host_port:localhost:remote_port user_name@host_ip
user@local: $ ssh -Y -fN -L 9999:localhost:9999 $USER@x.x.x.x
- Open a remote Jupyter terminal. Input the address
http://127.0.0.1:9999in a web browser, and fill the token which displaied on the Jupyter server terminal. Or copy the full address with token to the browser.
There is another method which is moving above Jupyter command to .bashrc. Copy below code to your .bashrc, source it before use it.
alias tf1='docker run --gpus all -it --rm -p 9999:9999 --name cont1 -v `pwd`:/workspace 21b'

export USERNAME=$USER
export HOSTNAME='x.x.x.x' # to modify with IP or host name
export PCONT=9999
export CONTAINER='cont1'

# start remote Jupyter server in host machine
# example:
# $ jlr
# $ jlr container_name
function jlr {

  if [ ! -z $1 ]; then
    CONTAINER=$1
  fi

  cmd="ssh $USERNAME@$HOSTNAME \
       docker exec $CONTAINER \
       'jupyter lab --ip 0.0.0.0 --port $PCONT --allow-root'"

  echo "Running command '$cmd'"
  eval "$cmd"
}


# open Jupyter terminal in local machine
# example:
# $ jll
# $ jll container_name
function jll {

  if [ ! -z $1 ]; then
    CONTAINER=$1
  fi

  cmd="ssh -Y -fN -L $PCONT:localhost:$PCONT $USERNAME@$HOSTNAME"

  echo "Running command '$cmd'"
  eval "$cmd"

  url=$(ssh $USERNAME@$HOSTNAME \
          docker exec $CONTAINER \
          "jupyter notebook list" \
          | grep http | awk 'NR==1{print $1}')

  echo "URL that will open in your browser:"
  echo "$url"

  # select or add your browser
  firefox "$url"
  #chromium-browser "$url"
}

# kill Jupyter sever in host machine
# example:
# jlk
# jlk container_name
function jlk {

  if [ ! -z $1 ]; then
    CONTAINER=$1
  fi

  cmd="ssh $USERNAME@$HOSTNAME \
       docker exec $CONTAINER \
       'jupyter notebook stop $PCONT'"

  echo "Running command '$cmd'"
  eval "$cmd"
}
9 A Practical Example
Now we will run an example based on the above to show how to set up a new TensorFlow environment and use it. Note where the commands are running in.
- Pull the TensorFlow image.
user@host:$ docker pull nvcr.io/nvidia/tensorflow:21.02-tf1-py3
- Check image ID. The first 3 letters of the image is 21b.
user@host:$ docker images
- Start the container.
user@host:$ docker run --gpus all -it --rm -p 9999:9999 --name cont1 -v ~/example:/workspace 21b
- Donwload the script to run.
user@host:$ wget -O ~/example/example.ipynb https://raw.githubusercontent.com/aymericdamien/TensorFlow-Examples/master/tensorflow_v1/notebooks/3_NeuralNetworks/convolutional_network_raw.ipynb
- Start the Jupyter server. From this step, we use our computer/laptop to remotely control the host machine.
user@local:$ jlr
- Start the Jupyterlab terminal.
user@local:$ jll
- Select the example.ipynb script and run all cells. This script builds a convolutional neural network with TensorFlow and predicts handwritten digits from MNIST Dataset. The accuracy is printed at the end of the script as shown below.
      ...
      Step 470, Minibatch Loss= 69.0955, Training Accuracy= 0.977
      Step 480, Minibatch Loss= 145.1062, Training Accuracy= 0.977
      Step 490, Minibatch Loss= 603.8383, Training Accuracy= 0.969
      Step 500, Minibatch Loss= 794.5430, Training Accuracy= 0.953
      Optimization Finished!
      Testing Accuracy: 0.97265625
Important Notice: Although NGC containers are ready to use for TensorFlow or PyTorch etc, lots of popular packages are not included in NGC containers, such as Matplotlib, OpenCV, scipy etc. Need to use pip to install packages you need.
10 Summary
In brief, to set up the environment using NGC, we simply need to pull the target images from NGC and then run it in the container. Before we can use NGC, we need to install NVIDIA drivers and container toolkits, and get an API key from NGC. To make the development work more convenient, we can employ Jupyter to work remotely.
The document scratches the surface of containers and NGC, there are tons of things we need to dig deeper into, such as build customized containers, optimize containers, persist data etc. The advantages of containers make it have gained in popularity in recent years. In the machine learning area, setting up a development environment based on NGC is an essential skill for some roles. It is hard to conclude that Docker will replace Anaconda and Pip. They are powerful in different levels in the development environment setup, what we can do is utilize them to benefit our work.
References
NGC Container User Guide for NGC Catalog
Deep Learning with Docker Container from NGC — Nvidia GPU Cloud
Why Use Docker Containers for Machine Learning Development?